
How Gamepad Tester Tool Works
Game controllers are no longer just plastic shells full of buttons—they’re sophisticated input devices brimming with sensors, circuitry, and microcontrollers. If you’ve ever plugged in your Xbox controller or used an online gamepad tester to verify that your joystick isn’t drifting wildly to the left, you’ve already experienced a small miracle of hardware and software collaboration.
In this detailed, long-form guide, we’ll unpack exactly how a gamepad tester tool works from a technical standpoint. You’ll learn what happens when you press a button, how your inputs reach the tester interface, how calibration and signal processing occur, and which APIs make all this possible.
Buckle up—this is your backstage pass to the science and engineering of controller testing.
Introduction to Gamepad Tester Tools
A gamepad tester tool is a diagnostic program—either software you install locally or a browser-based app—that allows users to verify the functionality of their video game controllers. Typical examples include joystick drift checks, button press detection, dead zone analysis, and trigger sensitivity measurement.
Players, developers, and hardware tinkerers use these tools to ensure their controllers perform as expected. A typical tester might display a visual model of your controller, highlight pressed buttons, and show real-time movement paths for analog sticks.
Popular keywords related to this concept:
- Game controller test
- Online joystick calibration
- Xbox/PlayStation controller drift fix
- USB input device analysis
- HTML5 controller tester
Let’s start by understanding what’s inside a gamepad and how its components communicate.
PILLAR BLOG: How to Test Your Game-pad Online & PC [Step-by-Step Guide]
Table of Contents
- Introduction to Gamepad Tester Tools
- Core Components of a Gamepad
- Buttons and Switches
- Joysticks and Analog Sticks
- Triggers and D-Pads
- Vibration Motors and Feedback Systems
- How Gamepad Inputs Are Registered
- How a Gamepad Tester Tool Interprets Signals
- From Hardware Layer to Software Layer
- The Role of Device Drivers
- Using the HTML5 Gamepad API
- User Interface: Visualizing the Test Results
- Advanced Technical Concepts
- Axis Normalization and Dead Zones
- Sampling Rate and Input Latency
- Calibration Algorithms
- Step-by-Step: What Happens When You Use a Gamepad Tester Online
- Practical Applications and Use Cases
- Common Questions and Troubleshooting Tips
- FAQs (Schema Format)
- Conclusion and Key Takeaways
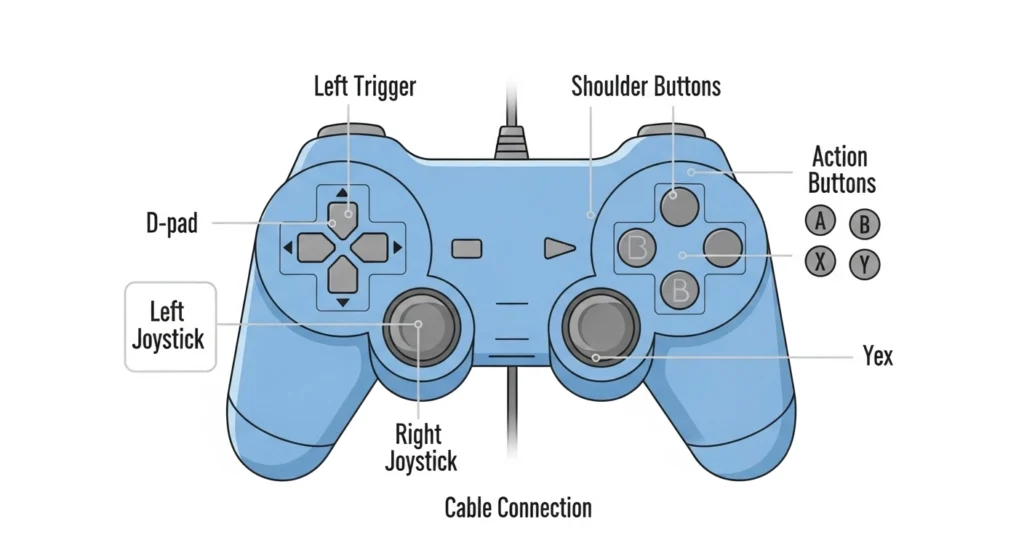
Core Components of a Gamepad
Understanding the inner workings of a gamepad is the foundation for appreciating how a tester interprets inputs.
Buttons and Switches
Every face button (A, B, X, Y; Square, Circle, etc.) is typically a momentary contact switch. When pressed, the internal conductor meets a circuit trace, closing a connection and sending a binary signal (pressed = 1, released = 0).
Modern controllers often include extra buttons for sharing, mapping, or interacting with in-game overlays. Each switch is registered through its own hardware input line, all managed by the microcontroller.
Joysticks and Analog Sticks
Analog sticks use two-axis potentiometers (one for X, one for Y) that vary voltage depending on stick position. The microcontroller converts analog voltages into digital values using ADC—Analog-to-Digital Converters.
- Rest position ≈ 0 position (neutral)
- Edge tilt: 100% axis deflection
- Calibration adjusts sensitivity and dead zones
Triggers and D-Pads
Triggers often act as analog inputs, similar to joysticks, with pressure-sensitive sensing (useful in racing games). D-pads, on the other hand, are directional buttons grouped into a cross, sending separate signals for up, down, left, and right.
Vibration Motors and Feedback Systems
While not directly tested by every tool, vibration motors are also part of system diagnostics. They respond to commands from the software layer (particularly when the tester supports force feedback testing).
How Gamepad Inputs Are Registered
Whenever a button or stick moves, the microcontroller inside your gamepad records that electrical change as input data. This data is transmitted to your PC or console via:
- USB (wired) communication, typically using the HID (Human Interface Device) protocol
- Bluetooth (wireless) connections, which packetize data before transmission
Each “report” includes a snapshot of all button and axis states at that exact moment—think of it as a constant flood of mini status updates.
These signals don’t yet mean much to your computer until proper software interprets them. That’s where device drivers and test tools step in.
How a Gamepad Tester Tool Interprets Signals
From Hardware Layer to Software Layer
Gamepad testers interact with inputs through operating system APIs that expose controller data in a standardized format.
Windows, for instance, provides XInput (for Xbox-class controllers) and DirectInput (for general HID devices). Linux and macOS have their own equivalents.
When you press a button:
- The controller sends a new HID report via USB/Bluetooth.
- The driver interprets it and forwards it to the OS API.
- The tester tool requests this input data through the API.
- The tester updates its UI to show the new state.
The Role of Device Drivers
Drivers are critical—they define:
- How many buttons or axes a controller has
- How analog values map to software-friendly ranges (-1.0 to +1.0)
- Which vibration motors can be triggered
Without correct drivers, testers might show incorrectly labeled or missing inputs.
Using the HTML5 Gamepad API
Many online testers rely on the HTML5 Gamepad API, a browser specification that lets JavaScript receive real-time input from connected controllers.
At its core:
JavaScript
navigator.getGamepads()
This method retrieves an array of recognized controllers. Each object includes properties like axes[], buttons[], and an id descriptor (useful to detect Xbox vs. DualShock controllers).
An HTML5-based online joystick tester or gamepad calibration tool then updates the canvas or interface every few milliseconds using animation frames.
User Interface: Visualizing the Test Results
The visual layer of a tester converts raw data into something humans understand intuitively. Common UI displays include:
- Button highlights: When a certain button is pressed, it lights up on-screen.
- Axis graphs: Real-time lines showing joystick deflection on X and Y axes.
- Dead zone rings: Circular areas showing where movement is ignored.
- Trigger gauges: Indicators showing percentage of pressure applied.
For example, if you move your left analog stick fully forward, the UI dot might hit the outer circle of a crosshair pattern. A drifting stick will appear slightly offset even when untouched—an instant diagnostic clue.

Advanced Technical Concepts
Here’s where things get a little nerdy (in the best way).
Axis Normalization and Dead Zones
Every joystick outputs slightly different voltage values due to hardware tolerance. To standardize results, software “normalizes” axis values to a consistent scale (typically -1.0 to +1.0).
Dead zones are areas near the neutral position where tiny electrical noise or stick variations are ignored—important to prevent unintentional movement in games.
There are two types:
- Static Dead Zone: Fixed radius where no input is registered.
- Dynamic Dead Zone: Adjusted automatically based on device calibration history.
Sampling Rate and Input Latency
Sampling rate = how frequently the controller reports new data (e.g., 125 Hz = 125 times per second).
Lower sampling means sluggish response, while higher frequencies produce ultra-responsive testing. Testers often visualize latency using timestamp comparisons between reports.
Calibration Algorithms
Gamepad calibration adjusts baseline readings and maximum range to align the physical device with expected digital values. Algorithms detect:
- Offset drift (neutral alignment)
- Sensitivity scaling (response curves)
- Non-linear axis deviations
Some advanced testers even support custom response curves, letting users remap linear joystick movement into exponential or logarithmic scales—handy for racing simulations.
Step-by-Step: What Happens When You Use a Gamepad Tester Online
Let’s trace the complete life cycle of an input event:
- Connection Initiation: You plug in or pair a controller. The operating system identifies it as a HID-compliant device.
- Driver Handshake: The correct driver loads (XInput, DirectInput, etc.).
- API Registration: The tester tool uses the HTML5 Gamepad API or another access layer to request the controller list.
- Polling Begins: The tester refreshes device data continuously (often every animation frame, ~16 ms).
- Input Detection: Each button press or stick movement changes numerical arrays representing control states.
- UI Update: The tool converts numbers into visual feedback (flashing buttons, moving dots).
- Optional Calibration: User can adjust sensitivity, map dead zones, or realign axes.
- Result Logging: Some testers let you save reports for debugging or online support submission.
And that’s the invisible dance that lets you say, “Yep, my left trigger finally works.”
TRY OUR GAME-PAD TESTER TOOL : GAME-PAD TESTER TOOL
Practical Applications and Use Cases
- Gamers: Check for analog drift or broken inputs before competitive matches.
- Developers: Validate that software properly reads controllers via APIs.
- Repair Technicians: Diagnose faulty joystick sensors or sticky buttons.
- QA Teams: Automate input logging for debugging and game testing.
- DIY Builders: Test custom arcade sticks or Raspberry Pi gamepads.
It’s safe to say that gamepad testers are as vital to gaming hardware as stress tests are to CPUs.
Common Questions and Troubleshooting Tips
| Problem | Likely Cause | Typical Fix |
| Controller not detected | Browser lacks permission or driver missing | Reconnect or update driver |
| Joystick drifts | Sensor misalignment | Calibrate or clean joystick |
| Button not responding | Physical issue or wiring fault | Test continuity with multimeter |
| Incorrect layout | Non-standard HID mapping | Remap buttons in gamepad tester |
| Lag in online tester | Browser refresh delay | Try native tester software |
FAQs (Schema Format)
Q1: What is a gamepad tester tool?
A gamepad tester tool is software that checks and visualizes controller input data, verifying that buttons, triggers, and joysticks function correctly.
Q2: How do I fix joystick drift?
Calibrate your joystick using an online tester or console settings. If drift persists, clean the potentiometer or replace the analog stick module.
Q3: Do I need to install anything to use a browser-based tester?
No, most online tools use the HTML5 Gamepad API, so you only need an updated browser and a connected controller.
Q4: Can a gamepad tester measure input lag?
Yes, advanced testers timestamp each input event to estimate latency, helping gamers diagnose delays or communication issues.
Q5: Are all controllers supported?
Most modern HID-compliant controllers work—Xbox, PlayStation, Nintendo, and generic USB gamepads—but some may need custom drivers.
Conclusion and Key Takeaways
A gamepad tester tool is more than a flashy button-check screen—it’s a miniature laboratory for your controller. By translating physical inputs into digital reports through APIs like XInput or the HTML5 Gamepad API, testers allow you to visualize and fine-tune every part of your controller’s behavior.
Key insights:
- Controllers mix analog sensors, buttons, and firmware communication.
- The tester reads signals via OS-level driver APIs.
- Calibration ensures accuracy and consistency.
- Browsers can interpret real-time input using JavaScript and the Gamepad API.
Whether you’re debugging a finicky joystick or building an indie game that relies on precise inputs, understanding how these tools work gives you both control and confidence—literally and figuratively.
External Sources For More Info: