
Introduction-Testing Vibration Motors on Gamepads
There is nothing more immersion-breaking than a cinematic explosion that happens in total silence because your controller’s vibration motors decided to take the night off. Most people assume that if a controller doesn’t rumble, the little weighted motors inside are ‘burnt out,’ but in my experience, that’s rarely the case. Between Windows ‘Battery Saver’ modes and weird Bluetooth driver conflicts, the signal to vibrate often just gets lost in translation. In this guide, I’ll show you how to use GamepadScan to trigger a manual ‘Rumble Stress Test’ and how to tell the difference between a dead motor and a simple settings glitch.
In this comprehensive guide, you’ll learn exactly how to test gamepad vibration motors safely and accurately, using both hardware and software tools. We’ll also explore calibration methods, common vibration issues, and advanced troubleshooting for various controllers (Xbox, PlayStation, or generic USB gamepads).
Let’s bring the feel back to your games!
Related Post: Controller Buttons Not Responding? Fix Them Fast
Table of Contents

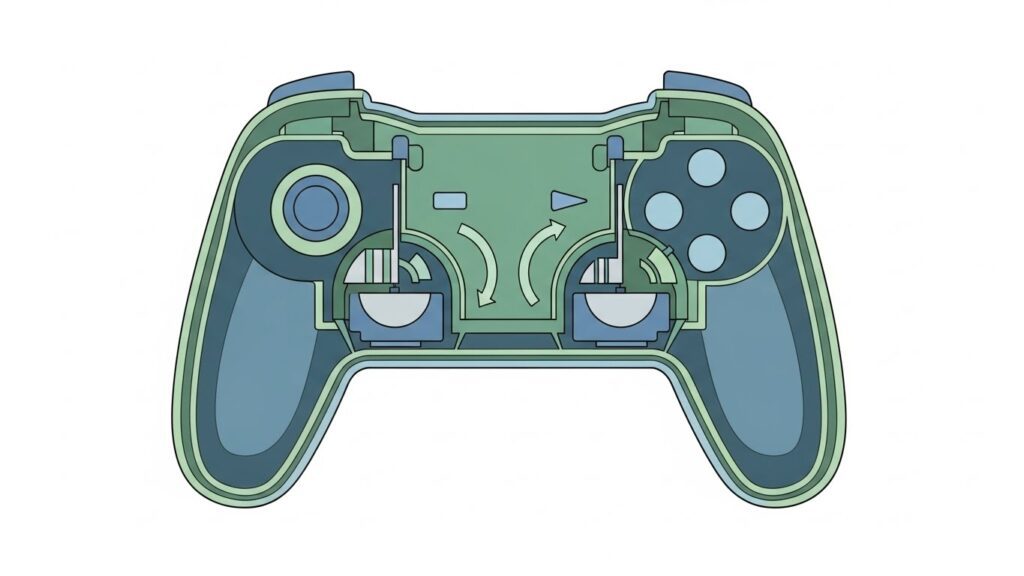
FIGURE 1 SHOWS OUR TOOL INTERFACE FOR TESTING VIBRATION OF CONTROLLER
Why Test Vibration Motors on Gamepads?
Testing vibration motors is not just for repair professionals. Gamers, developers, and hobbyists all have reasons to check their controller’s haptics:
- Gamers: Ensure consistent rumble feedback for precision and immersion.
- Developers: Calibrate motor intensity in racing sims or shooters via the HTML5 Gamepad API or DirectInput.
- Repair Technicians: Diagnose whether a motor, wiring, or driver chip is faulty.
- DIY Enthusiasts: Verify custom mods or replacement parts work correctly.
A functioning vibration system enhances tactile feedback—giving your hands subtle cues that improve control, timing, and the overall gaming experience.
Understanding How Gamepad Vibration Works
Gamepads create vibration through small rotary motors with eccentric rotating masses (ERMs) or linear resonant actuators (LRAs).
- ERMs: These have an off-center weight that spins rapidly to produce vibration. Common in Xbox and older PS controllers.
- LRAs: More advanced; they use a linear motion to vibrate precisely at certain frequencies (seen in DualSense and Switch Pro controllers).
Vibration signals are triggered by software—games send commands via the system’s API (like DirectInput, XInput, or SDL). The strength, duration, and pattern can be customized per motor.
Modern controllers often have two vibration motors, one in each handle—allowing asymmetric feedback for richer sensations.
Types of Vibration Motors in Gamepads
| Type | Common Use | Vibration Style | Controllers |
| Eccentric Rotating Mass (ERM) | Simple rumble effects | Spinning weight vibration | Xbox One, PS3 |
| Linear Resonant Actuator (LRA) | Advanced haptic feedback | Linear oscillation | PS5 DualSense, Nintendo Switch |
| Dual ERM Motors | Left + right side amplitude control | Independent vibration per side | Xbox Series, Logitech F310 |
| HD Haptics Motors | Programmable pulses & feedback | Adaptive triggers, detailed feel | PS5 DualSense |
Tools and Software You’ll Need
Before you start testing, gather these handy tools and apps:
Hardware
- A USB data cable (avoid charge-only cables).
- A multimeter for electrical continuity checks (if you’re diagnosing hardware).
- Small screwdrivers for internal inspection.
- Optional: Motor driver board (Arduino or Raspberry Pi if testing independently).
Software
- Windows Game Controller Tester (via Control Panel > Devices and Printers).
- HTML5 Gamepad Tester (open-source web-based tool).
- Steam Big Picture Controller Configurator (lets you trigger rumble manually).
- DS4Windows / DSX for PlayStation controllers on PC.
- Android Gamepad Tester apps (for mobile USB OTG setups).
Pro tip: When you’re unsure if the issue is hardware or driver-related, test on multiple platforms.
Step-by-Step: Testing a Gamepad’s Vibration Motors
Let’s go through the process in detail.
Step 1: Connect the Controller
Use a reliable USB connection—wireless connections may skip rumble tests due to limited power. Ensure your system recognizes the controller (check Device Manager on Windows or System Information on macOS).
Step 2: Open a Gamepad Tester Tool
Visit an online HTML5 Gamepad Tester. As soon as your controller connects, the site displays buttons, axes, and vibration test functions.
Step 3: Trigger the Vibration
Find the “Vibrate” or “Rumble Test” button (depending on the tool).
You should feel vibration in both grips. Some tools let you choose left motor or right motor—ideal for comparing strength.
Step 4: Interpret the Results
| Observation | Possible Cause |
| No vibration at all | Motor disconnected or driver issue |
| Only one side vibrates | Faulty wiring or individual motor failure |
| Weak vibration | Low USB power or degraded motor |
| Irregular / buzzing noise | Imbalanced rotating weight or debris |
Step 5: Confirm with a Secondary App
Always double-check using another software tool (e.g., Steam settings). This verifies whether the issue is app-specific.
💡 Developer’s Pro Tip: The ‘Stuck Motor’ Flick “Here is a weird but effective hardware trick: Sometimes, if a controller hasn’t been used in months, the tiny rotating weights on the motors can actually ‘stick’ due to dust or humidity. If our tester shows that the ‘Vibration’ signal is being sent (you’ll see the status bar active) but you feel nothing, give the side grips of your controller a firm (but careful!) tap against your palm. I’ve seen this ‘jumpstart’ a stalled motor dozens of times. My recommendation? Always test ‘Heavy’ and ‘Light’ rumble separately. If only one side works, it’s a hardware issue. If neither works, it’s almost certainly a software setting or a low-battery restriction in your OS
Testing Gamepad Vibration on Windows, macOS, and Android
Windows
- Open Control Panel → Devices and Printers.
- Right-click your controller → Game Controller Settings → Properties.
- Use the Vibration test tab if available.
- Alternatively, use the HTML5 Gamepad Tester in Chrome Edge or Firefox.
macOS
- macOS natively supports limited vibration testing, so use an emulator or trial game that supports haptics.
- For deep testing, tools like Enjoyable or ControllerMate help visualize axis and rumble behavior.
Android (OTG)
- Connect controller via USB OTG cable.
- Download “Gamepad Tester” or “Haptic Feedback Test” from Google Play.
- Trigger rumble through the test screen and observe motor response.
Troubleshooting Vibration Motor Problems
1. Driver Issues
- Reinstall or update controller firmware.
- Ensure correct mode (e.g., XInput vs DirectInput).
- Disable conflicting tools like DS4Windows temporarily.
2. Hardware Issues
If only one side vibrates:
- Disassemble carefully using small Phillips screwdrivers.
- Check motor wires—look for loose solder joints.
- Use a multimeter to verify continuity (should show near 0Ω).
3. Power Supply
Controllers need stable voltage (5V via USB). Weak ports can cause weak vibration. Try another USB slot or a powered hub.
4. Motor Replacement
For DIY repairs:
- Match the motor voltage (usually 3–5V).
- Ensure proper polarity and positioning to maintain balance.
- Replacement parts are available from sites like iFixit or AliExpress.

FOR CHECKING CALIBRATION AND DEAD ZONE OF JOYSTICK IN OUR TOOL
Advanced Calibration Tips for Haptic Feedback
Fine-tuning vibration levels gives developers and enthusiasts granular control:
- Dead Zone Compensation: Combine vibration intensity with joystick movement to simulate resistance.
- Directional Feedback: Trigger left or right vibration only when turning or taking directional damage.
- Timing Control: Create short, rapid pulses for bullets; longer, gradual waves for driving games.
- Cross-Platform Consistency: Because intensity varies by operating system, adjust motor duty cycles (PWM signals) for uniform feel.
For game developers, the HTML5 Gamepad API provides a vibrationActuator.playEffect() method—perfect for testing custom patterns in browsers.
Safety Tips When Testing Motors
- Avoid running motors continuously for long durations—they can overheat.
- If disassembling a controller, unplug it first (no power).
- Keep tools away from motor rotors to avoid physical damage.
- Ensure proper reassembly—misplaced casing can muffle or distort vibration feedback.
FAQs About Testing Vibration Motors
Q1. How do I know if my gamepad vibration motor is faulty?
Try multiple apps or PCs. If you consistently get no vibration even when enabled, one or both motors might be damaged.
Q2. Can I test vibration on Bluetooth controllers?
Yes, but results may vary due to limited wireless power delivery. Testing via USB gives more accurate feedback.
Q3. Why does my controller vibrate constantly?
This typically indicates a shorted transistor or stuck driver signal inside the controller PCB.
Q4. Do all gamepads support adjustable vibration intensity?
No. Some budget or generic USB controllers only support on/off rumble signals without intensity control.
Q5. Is it possible to create custom vibration patterns?
Yes—for developers, APIs like XInputSetState on Windows or the HTML5 Gamepad API allow programming rumble sequences of varying strength and duration.
(These FAQs can be formatted in JSON-LD schema for SEO enhancement.)
Conclusion and Key Takeaways
Testing vibration motors on gamepads isn’t just a tech chore—it’s how you ensure your controller delivers those cinematic “feel” moments that make gaming immersive.
Key Takeaways:
- Always test vibration via both hardware (motors) and software (drivers, apps).
- Use cross-platform tools like HTML5 Gamepad Tester for accuracy.
- Troubleshoot from simplest (driver) to most complex (hardware) causes.
- Keep safety in mind when opening controllers.
- For power users, calibrate vibration intensity for personalized gameplay.
By following this complete guide, you now have the knowledge to test, diagnose, and optimize any gamepad’s vibration system—whether you’re fine-tuning a racing wheel’s rumble or bringing new life to an old controller.
External Resources: