
Introduction-Calibrate Your Gamepad Without Any Software
As a dedicated PC gamer, I’ve learned that taking the time to allocate a few minutes for testing and calibrating your gaming controller on Windows can make a remarkable difference in gameplay. When you fine-tune your setup to achieve precise control, it reduces input lag and helps you address performance issues before they become frustrating mid-battle. The necessary steps might seem small, but for those serious about smooth motion and accuracy, they’re essential. Whether you’re chasing high scores or simply improving reaction times, calibration ensures every command registers exactly as you intend.
PILLAR BLOG: How to Test Your Game-pad Online & PC [Step-by-Step Guide]
Table of Contents
How to Test Your Gaming Controller on Windows
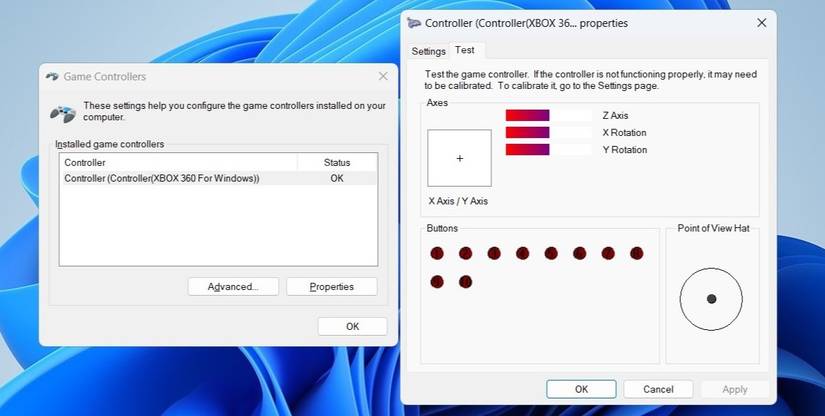
Testing a gaming controller on Windows 10 or 11 doesn’t require any fancy software—just a few simple steps inside the built-in control panel. Here’s my tried-and-true routine to determine if every button, stick, and trigger is functioning correctly:
- Press the Windows key and type “control panel” in the search menu, then press Enter to access it.
- In the top-right corner, change the view type to Large icons using the drop-down menu.
- Open Devices and Printers and find your Game controller icon.
- Right-click the device, then select Game controller settings from the context list.
- Click Properties to open the Test tab under settings.
- Move the sticks in every direction while watching the on-screen indicator—each movement should correspond precisely within the window.
- Press each button and trigger; observe their responses to confirm everything works perfectly for calibrating later.
When each action reacts smoothly, the hardware is reading your input exactly as it should—a small but essential victory every gamer appreciates.

How to Calibrate Your Gaming Controller Using the Control Panel
When it comes to calibrating your gaming controller on Windows, the built-in Settings tools can make the process quick and reliable. Over time, you might notice drifting sticks or poor responsiveness—this is where calibration brings back accuracy and smoother control. Follow these steps I often use to fine-tune my setup:
- Open the game controller settings through the menu where you tested your device earlier.
- From the list, select your controller and click Properties.
- Under the Settings tab, choose Calibrate to launch the calibration wizard.
- Click Next to initiate the calibration process, and complete the specific actions it prompts—usually performing movements with the analog sticks or pressing buttons in a set pattern.
- When everything feels steady and aligned, click Finish to complete the process.
After following these steps, you’ll notice a clear improvement—the result is often tighter, better control and restored sensitivity, feeling nearly the same as when the controller was brand new.
How to Calibrate Your Gaming Controller via Steam
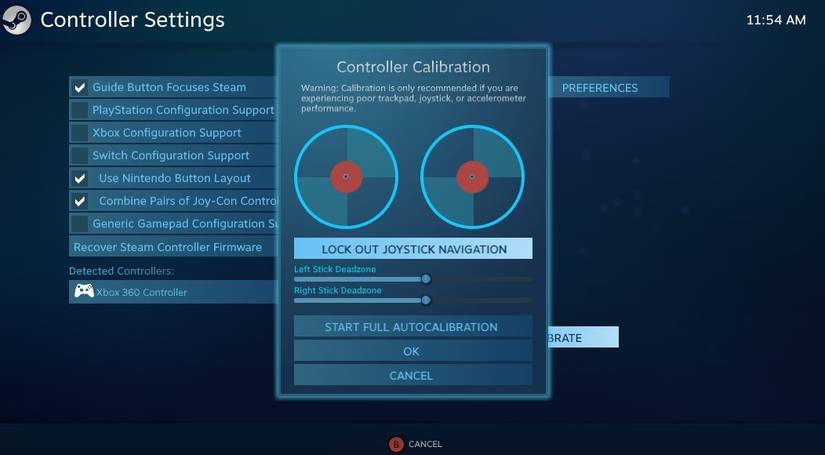
If you prefer Steam’s Controller Configurator instead of the Control Panel, there’s a convenient way to calibrate your gaming controller on Windows directly through the Steam client. The platform supports a wide range of controllers, both popular and generic input devices, making it perfect for nearly any PC setup. Here’s how I handle the calibration process step by step:
- Open the Steam client and click the Steam menu in the top corner, then select Settings.
- In the left pane, switch to the Controller tab under General Settings.
- Select your controller from the Detected Controllers list.
- Hit the Calibrate button and follow the on-screen instructions carefully.
- Click Start Full Autocalibration, then move the analog sticks in all directions when prompted to ensure accurate tuning.
- Once complete, confirm the calibration results and enjoy your precisely tuned controller.
This process, though simple, lets Steam handle fine control adjustments efficiently—especially useful when multiple devices are installed, ensuring every command responds exactly as it should.

How to Reset Controller Calibration to Default Settings on Windows
Sometimes your gaming controller just doesn’t feel right—its sensitivity seems off, or the movement doesn’t respond as expected. In that case, the best fix is to reset the calibration settings back to default on Windows. I’ve done this countless times to resolve minor problems that often sneak in after tweaking controls. Here’s how to do it properly:
- Press Win + R to open the Run dialog box.
- Type joy.cpl and press Enter to open the game controller settings window.
- From the list, select your controller and click Properties.
- Go to the tab labeled Settings, then click the Reset to Default button.
- Confirm your choice by selecting OK, and the resetting process will start immediately.
This quick procedure can help when your controller feels unresponsive or inaccurate—sometimes the blame lies not with the hardware but with the calibration data itself, and returning to default often clears up the issue completely.
Conclusion
After walking through every step of how to calibrate your gamepad without any software, it’s clear that whether you’re testing, calibrating, or even resetting your gaming controller on Windows, the process depends more on small, precise actions than high-end tools. From adjusting sensitivity, refining accuracy, and reviewing input lag, to using reliable hubs like the Control Panel or Steam’s Controller Configurator, each method strengthens your overall command of gameplay. I’ve found that taking the time to fine-tune settings, follow steps carefully, and occasionally revert to default calibration can instantly resolve issues and achieve better performance. With these straightforward approaches, any dedicated gamer can easily address minor problems, observe movement responsiveness, and ensure every button and stick performs exactly as intended—proof that mastery doesn’t always require extra software, just a bit of patience and precision.